How to make your very own cryptocurrency (deploy your first smart contract!)
Easily create and deploy a ERC-20 token
Search for a command to run...
Easily create and deploy a ERC-20 token
In this tutorial, we will learn how to use SimpleWebAuthn to allow users to register and login with passkeys in a Next.js app. It assumes you have basic knowledge of Typescript and Next.js. We’ll be building this (live demo). If you’d rather dive hea...
The trade-offs between security, scalability, and decentralization. And does Proof of Stake really solve it?
A jargon-free guide to what web3 means for you
You can convert any Javascript code into these characters: ()[]{}!+ and only these characters. Here's how: Numbers We can get 0 by casting an empty array using +[]. The + is the unary plus, which converts the right side into a numeric value, i.e. 0, ...
Ever thought about making your own crypto? Now you can, and it's way easier than you think.
This tutorial is going to teach you how to write and deploy a smart contract on Ethereum, and that smart contract will contain all the rules of your token. By the end of it you'll be able to see your new token in your crypto wallet and transfer to other wallets!
Creating your own coin may seem like an extremely complicated task - and you're right. Today we won't be creating a coin, we'll be creating a token.
What's the difference?
A coin has its own blockchain. Bitcoin operates on the Bitcoin blockchain, Ethereum operates on the Ethereum blockchain, and Dogecoin operates on the Dogechain blockchain. They each have their own transaction ledger.
A token, however, is built on an existing blockchain. They do not have their own transaction ledger, and instead are simply smart contracts that are deployed to a blockchain. A token can represent literally anything - lottery tickets, a painting, an ounce of gold, XP points in a video game, you name it. Some of these examples are non-fungible tokens (or NFTs), which means that they all have different values and are not equal to one another. But that's not what we want from a currency - my dollar should be equal in value to your dollar.
That's where something called ERC-20 comes in. ERC-20 introduces a standard for fungible tokens, i.e. tokens that are equal in value. 1 of my token will be equal to 1 of yours. ERC-20 tokens are built on the Ethereum network, and act similarly to $ETH in this way. An ERC-20 token has other characteristics too, which you can check out here. In this tutorial we will be building an ERC-20 token.
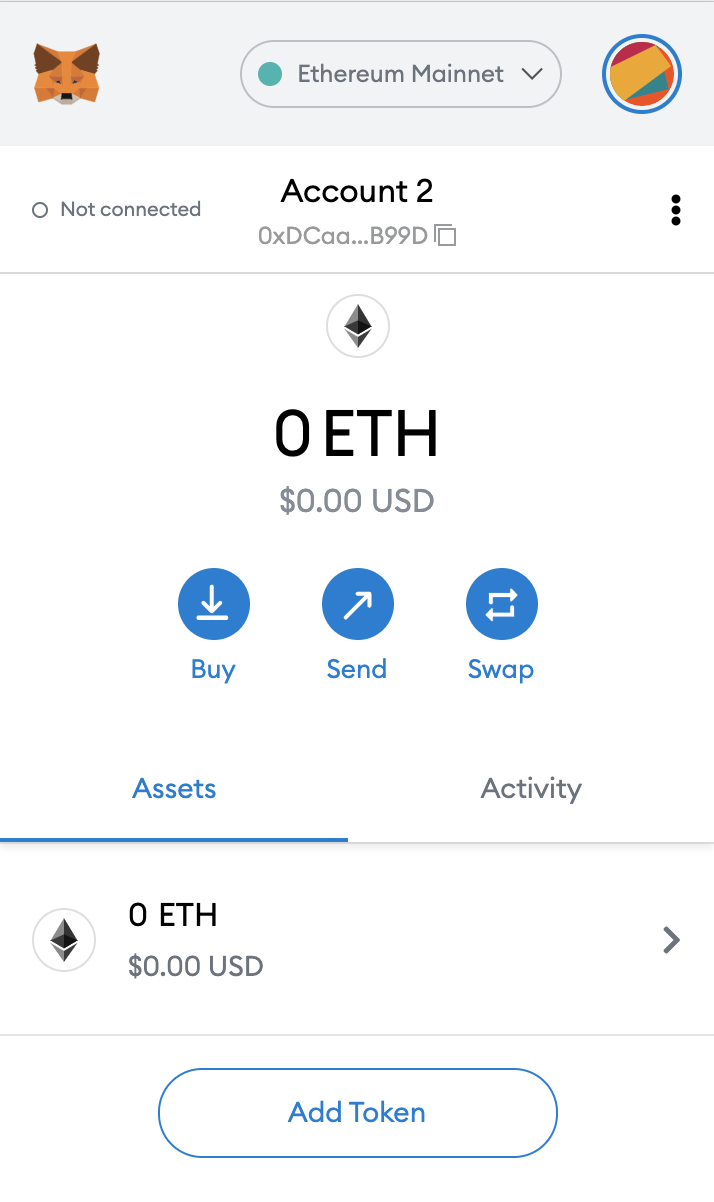
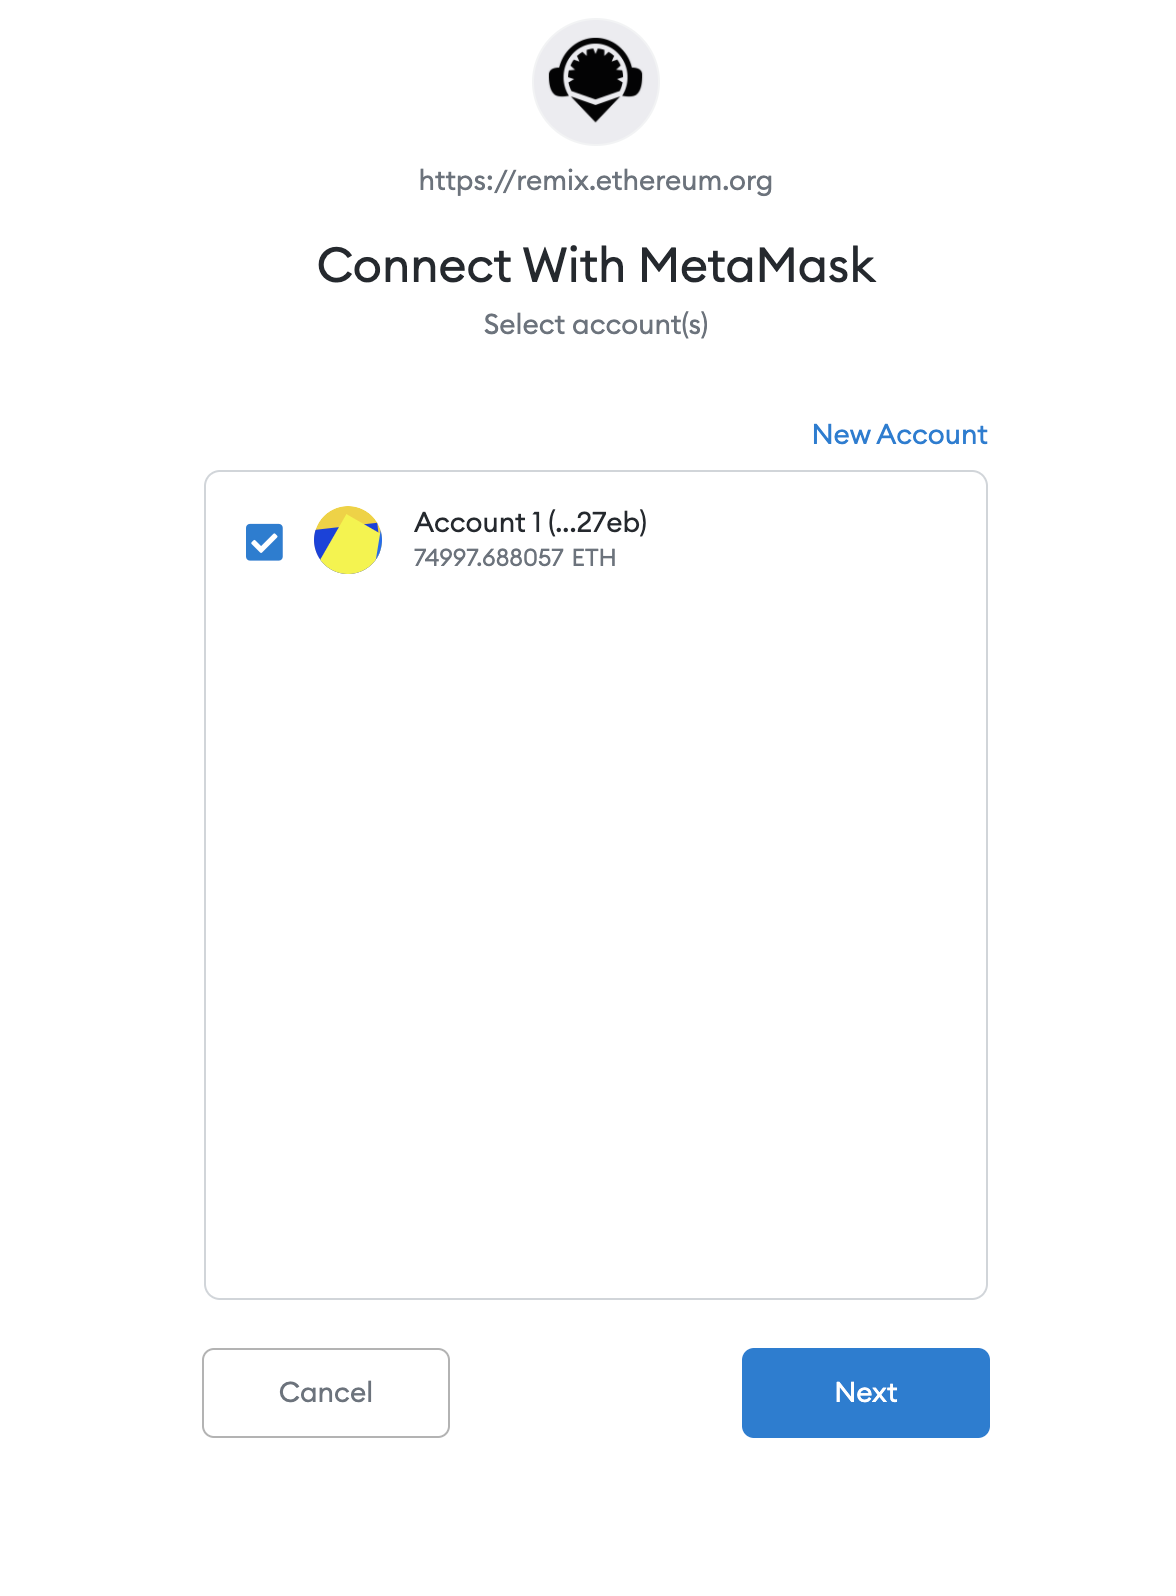
Before continuing with any sort of web3 development, you'll need to install Metamask. It's a crypto wallet browser extension that allows you to interact with blockchain apps. Install that to your chosen browser and follow the steps to set up an Ethereum wallet. When you're done, you should see something like this:
We'll be deploying our smart contract on the Kovan testnet for this tutorial. A testnet is a network that simulates Ethereum, so you can deploy and test your code on the blockchain without using real assets. You'll need to connect your Metamask to Kovan from the drop-down at the top (if you've just installed Metamask this dropdown will default to Ethereum Mainnet).
Fun fact: there are 5 testnets currently in use, and they're all named after subway stations around the world.
The next step is to get some ETH into your Kovan wallet. You can use this faucet - simply paste your wallet address. This isn't real ETH so don't get too excited! After doing that, you should see the number of ETH in your wallet go up, and if you click under the Activity tab you'll see the transaction.
Ethereum smart contracts are written in a programming language called Solidity. For the sake of this tutorial, we won't go into the nitty details of its syntax or keywords. If you'd like to learn Solidity, one of the most popular ways to do so is actually through a game called CryptoZombies.
An easy way to get started with writing smart contracts in Solidity is by using Remix. It's an online IDE that allows you to easily write and deploy smart contracts to Ethereum. It will look like this when you open it:
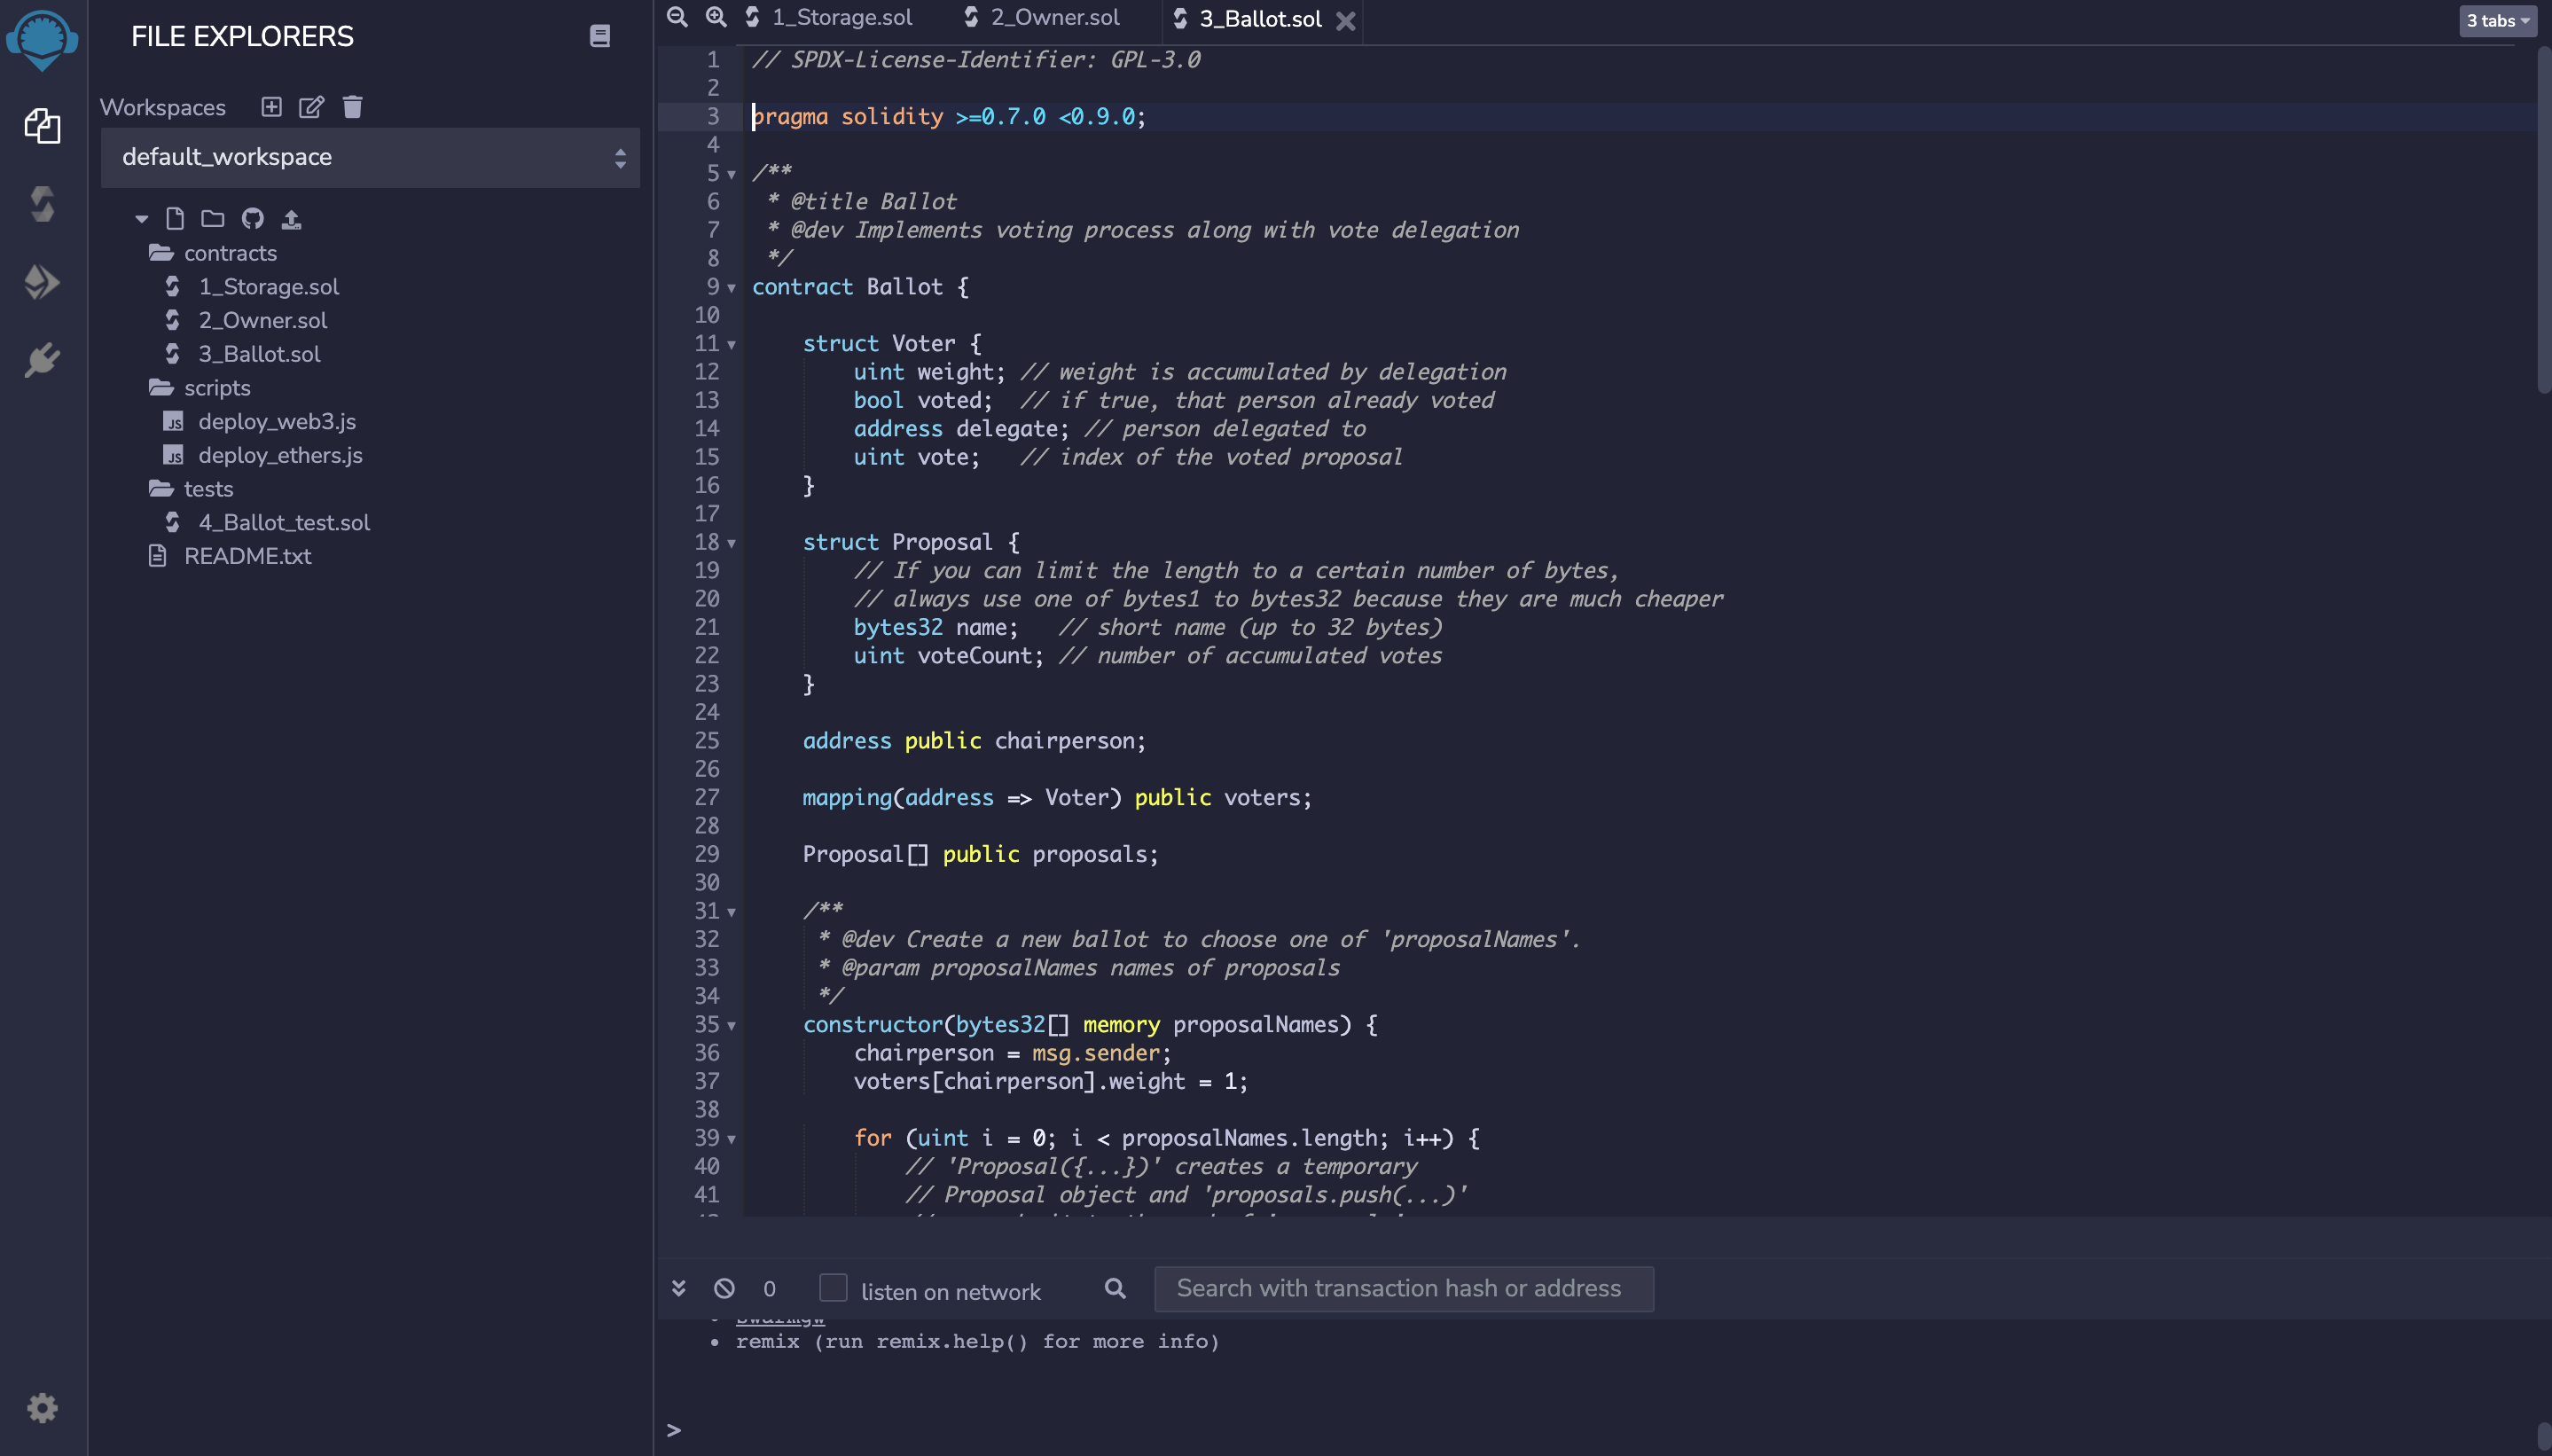
Ignore the code that is already there for now. They are good examples of smart contracts that you can look into it later to learn more about Solidity. I'll be making some short video tutorials soon going through each of these examples so make sure you're following me on Twitter and won't miss that announcement!
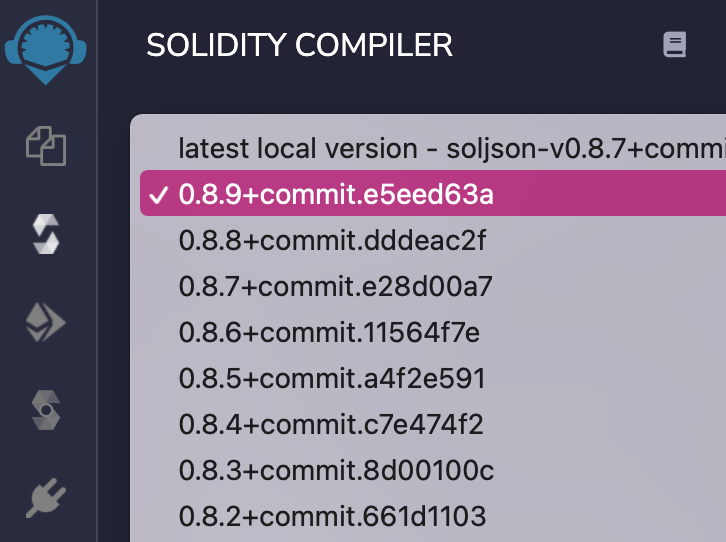
Before you start writing code, update Remix's compiler settings to use the most recent version of Solidity. You can do this by clicking the Compiler button in the side bar and selecting the top option in the dropdown under Compiler. At the time of writing, I'm using version 0.8.9. (Note: Solidity changes fast, so if you're following this tutorial months after it is written and using the most recent version, you may run into some problems. If this happens, please reach out to me on Twitter and I'll update this tutorial.)
Create a new file by clicking this icon:
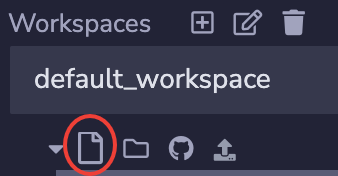
and name it whatever you'd like your token to be called. It is best practice to give the file the same name as your contract. In this tutorial we're going to call it KittyToken.

Now we're ready for some code.
The first thing we have to include is our pragma statement. It tells Solidity which version our code is written for. The version here should be the same as the version you selected for your compiler.
pragma solidity ^0.8.9;
Next we're going to import a ERC-20 implementation from Open Zeppelin. This does most of our work for us, and any other code we write will be customizing our token. Easy, right?
import 'https://github.com/OpenZeppelin/openzeppelin-contracts/blob/master/contracts/token/ERC20/ERC20.sol';
I highly recommend you check out this link yourself and have a look into its functions to get an understanding of how an ERC-20 token is working.
Next, let's write our contract and inherit ERC-20.
contract KittyToken is ERC20 {
    constructor() ERC20('Kitty Token', 'CAT') {}
  }
Here, the is keyword inherits the ERC20 implementation that we've imported. We've passed two arguments to our ERC-20 constructor, the token name and the ticker (like Bitcoin and BTC.)
That's it. You've created an ERC-20 token smart contract.
But no tokens exist.
If you have a look at Open Zeppelin's ERC-20 code, you'll see a comment at the top:
This implementation is agnostic to the way tokens are created. This means
that a supply mechanism has to be added in a derived contract using {_mint}.
For the purpose of this tutorial, let's mint some tokens on deploy and send them to our wallet. Minting is basically creating new tokens, increasing the number of tokens that exist. The _mint function already exists in Open Zeppelin, so we'll call it in our constructor.
contract KittyToken is ERC20 {
    constructor() ERC20('Kitty Token', 'CAT') {
            _mint(msg.sender, 100 * 10 ** 18);
        }
    }
What's happening here?
_mint takes two arguments: the address of the account the token is minted to, and the number of tokens that are minted.
msg.sender is a built-in variable in Solidity and refers to the person currently connecting with the contract. Since we're the ones who has deployed the contract & executed the constructor, we are msg.sender in this case.
100 * 10 ** 18 looks a bit complicated, but all it's doing is describing the number of decimals tokens, which allows your token to be be split into smaller parts i.e. you can send 2.1 or 0.73 tokens. * 10 ** 18 is the standard for tokens, and you can have a look into what that means here .
Your full code will look like this:
pragma solidity ^0.8.9;

import 'https://github.com/OpenZeppelin/openzeppelin-contracts/blob/master/contracts/token/ERC20/ERC20.sol';

contract KittyToken is ERC20 {
    constructor() ERC20('Kitty Token', 'CAT') {
            _mint(msg.sender, 100 * 10 ** 18);
        }
    }
Now you've created a smart contract that will mint and send you 100 of your new ERC-20 tokens when it's deployed! There are loads more customizations you can do (ability to mint more tokens, limit to how many exist, requirements for burning tokens, etc) but for now, let's get onto the most exciting step.
Before we can deploy our contract, we need to compile it. With your token smart contract open, open the Compile tab like you did before, and click Compile KittyToken.sol.

Your contract is now compiled and ready for deployment! Next, we're going to connect Remix to our injected web3 provider, which in our case is Metamask. This will allow us to see our all our tokens in our wallet. Remix makes this incredibly easy and only requires a few clicks of a button.
Click the deploy button in the side bar, as shown below:

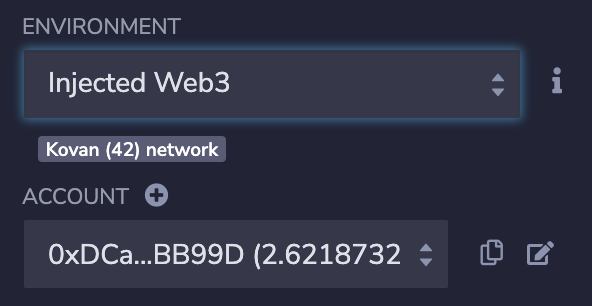
Under Environment, find Injected web3 in the dropdown. When you click this, you'll be redirected to a Metamask permission screen that looks something like this:
After giving permission, you should see the word Kovan underneath the Environment dropdown. You should also see your wallet address in the Account section. Check to make sure this is correct before continuing.
Then find your smart contract from the dropdown and hit Deploy. You'll be redirected to Metamask asking for permission (it'll cost some of the Kovan ETH that you got earlier). Click Confirm.

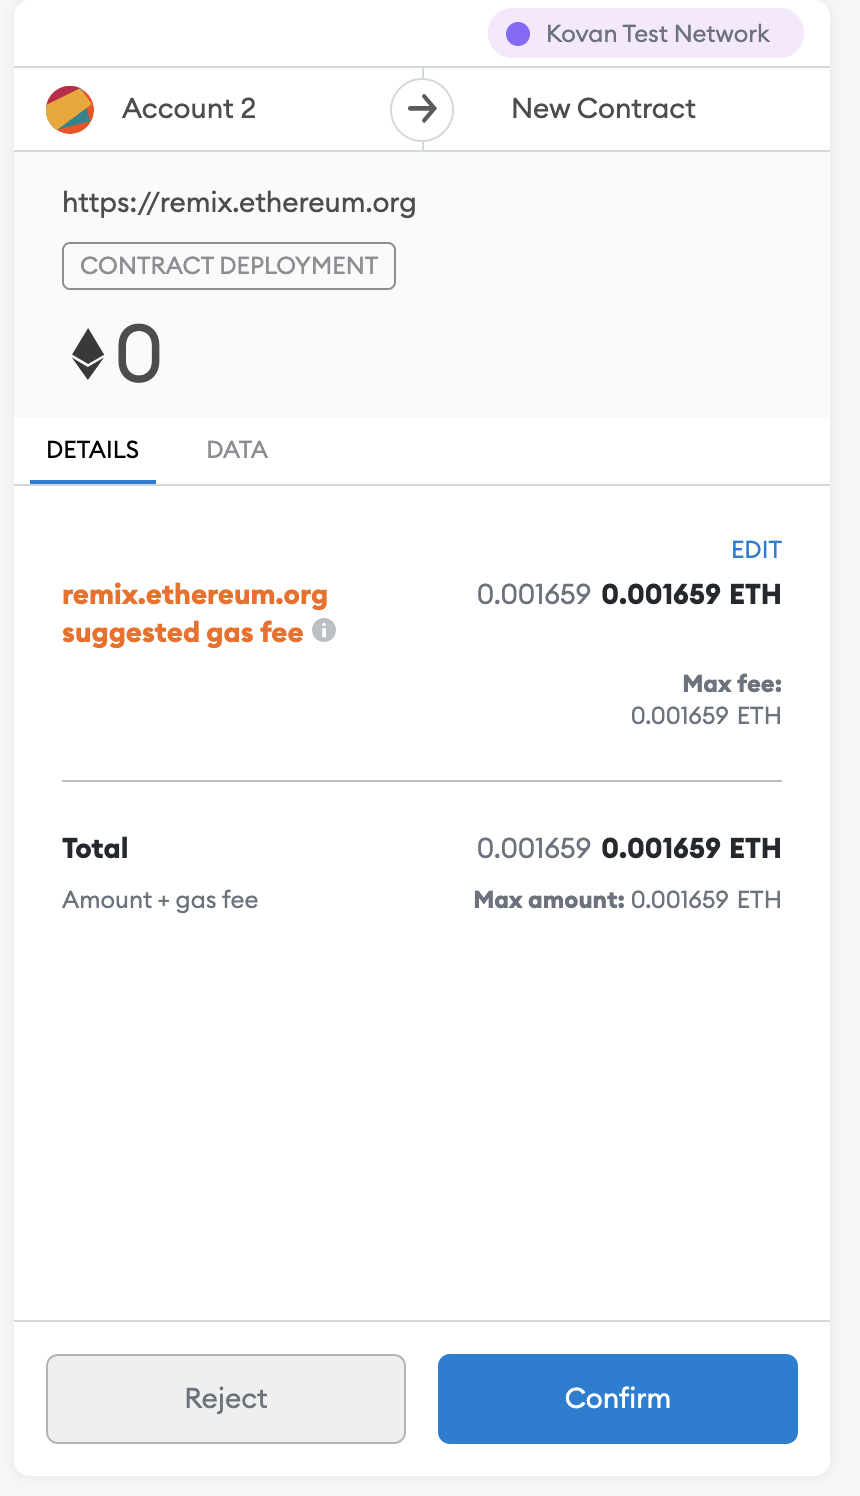
That's it - your smart contract is deployed onto the Kovan testnet!
Before we view this on Metamask, let's make sure everything worked. If you scroll down in the Deploy and run transactions tab and click the dropdown of your contract, you'll see some orange and blue buttons and fields.
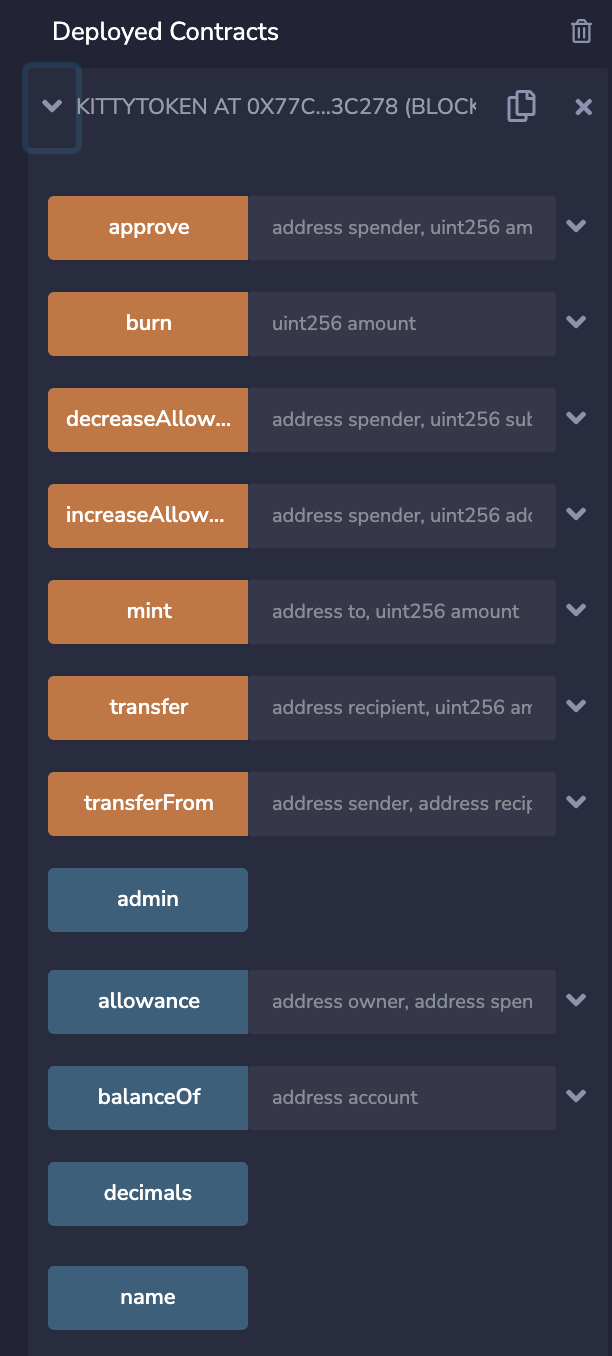
These are the different functions that your ERC-20 token contains. As you'll notice, we didn't write them - they are the functions our token inherited from the Open Zeppelin ERC-20 code. An orange button lets you write, while a blue button lets you read. To make sure that our contract was deployed and our constructor worked properly, copy your account address into the blue balanceOf field and click the balanceOf button. You should see a number that looks like this:
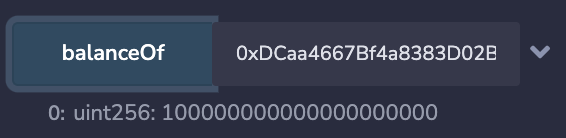
That number is not the number of tokens in base 10, it is a uint256 value that includes that * 10 ** decimal that we specified earlier. Really, this number means 100.
Now let's see this on Metamask!
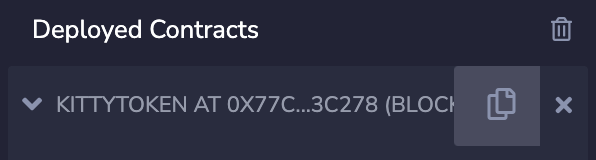
To do this, you'll need to copy the contract address. You'll find this under the Deployed contracts section.
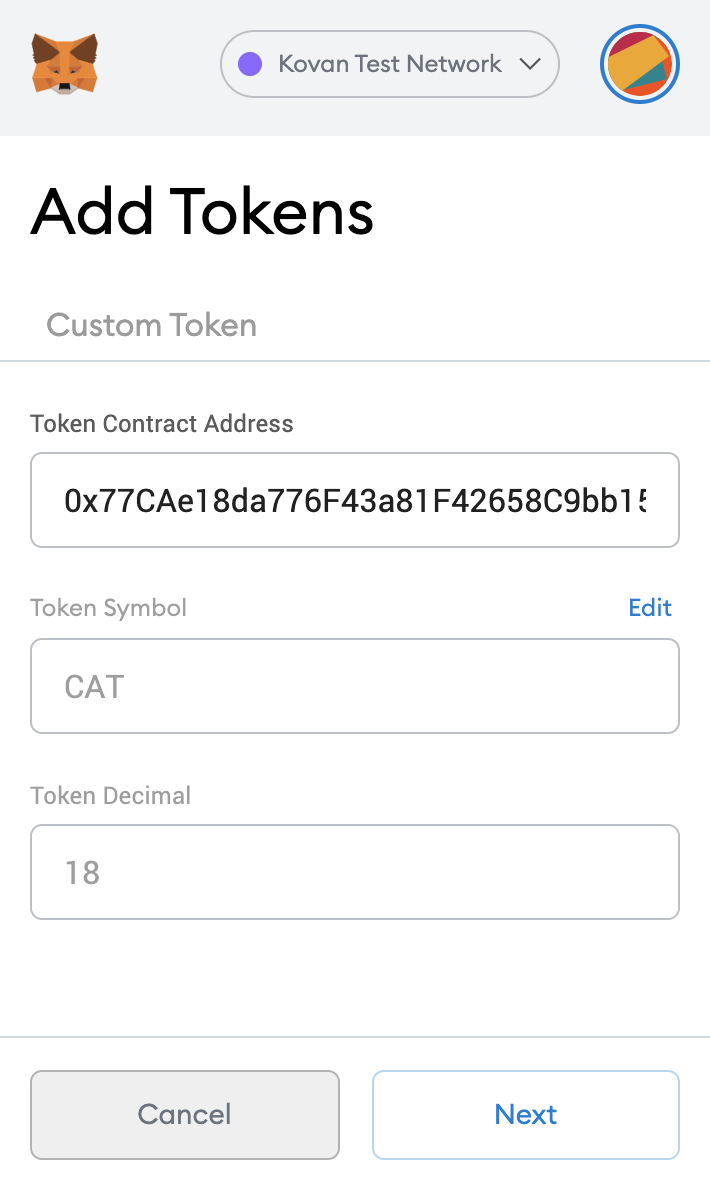
Then open Metamask, open your Assets tab and click Add token. Click Custom Token at the top and paste the contract address. The Token Symbol and Token Decimal fields should auto-populate.
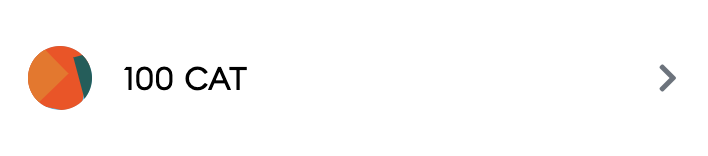
Then, after you click Next you should see your new token under your ETH in Metamask! You'll also be able to see that you have 100 tokens, which is exactly what we set in the smart contract. You can send these tokens between accounts in Metamask and it will act exactly like any other token on the Ethereum blockchain.
Now you've written and deployed your first smart contract on Ethereum! If you'd like to play around a little more with your token more, try creating a function to let you mint more outside of the constructor. You can even set limits on who can mint tokens, or the maximum number of tokens allowed to exist on the network - check out the require keyword. Remember, each time you deploy a smart contract, it will have a new address on Ethereum. That's a beautiful thing about blockchain - it's immutable.
Happy Solidity coding!